How to Align a Laser Cutting Machine or Laser Cutter-Bunny
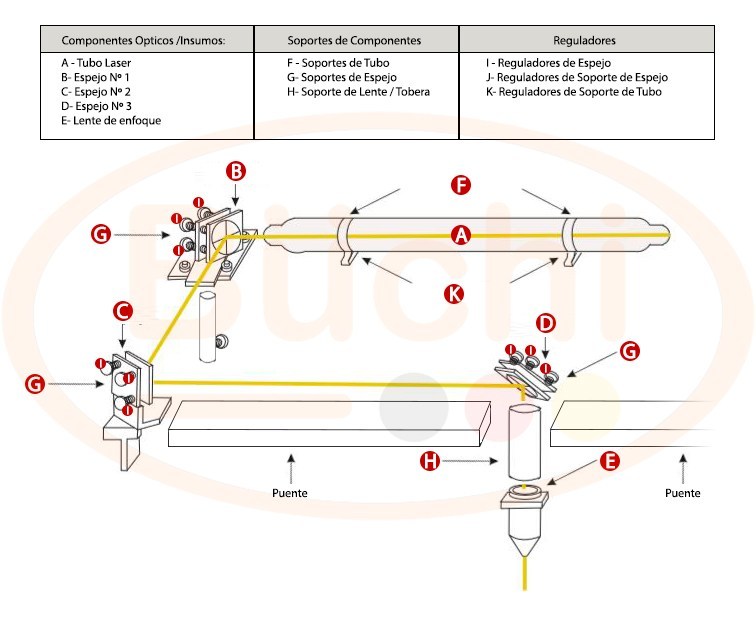
To properly align the mirrors of a laser cutter or a laser engraver you have to understand some concepts. It all comes down to knowing the components involved in the process. And understand how the laser beam is transported from the laser tube to the material we want to work.
We will define a glossary to understand each other throughout the tutorial:

Optical Components / Supplies:
Laser tube: It is the glass tube that is in the machine. Within it the laser medium (the laser beam) is generated. This component is an input that is changed when the gas inside is exhausted.
A – Mirror 1: It is the mirror that is next to the laser tube.
B – Mirror 2: It is the mirror that is at the tip of the bridge.
C – Mirror 3: It is the mirror that is at the top of the head.
D – Lens: It is located in the head, more precisely in the nozzle, near the peak. It is the component that focuses the laser beam at a point that is very small (less than 1/2 mm), it is also where the laser beam burns with greater power.
Component Stands
E – Tube supports: They are the ones that support the tube, they are below it. They can be adjustable or fixed.
F – Mirror stands: They are the ones that hold the mirrors. They are 3 different supports but the function is the same to hold the laser mirrors and also have the mirror regulators.
G – Lens support / Nozzle: It is an aluminum spout located in the head. Inside it is the focus lens, which is held by a nut.
Regulators
H – Mirror regulators: these are screws with counter nut that move the mirrors to adjust the trajectory of the laser beam. They can be two or 3 depending on the model.
I – Mirror support regulators: these are screws that adjust the supports of the mirrors to the structure of the machine. IMPORTANT: These should rarely be touched because a minimum movement of them radically changes (moves a lot) the path of the laser beam. This can incur physical damage to people and lightning can leave the machine.
J – Tube support regulators: they are used to raise or lower the tube in order to level the output of the laser beam.
The Optical Circuit, Laser Beam Transport
The optical circuit is all of the components mentioned above, through these the laser beam is transported until it reaches the material.
For proper alignment it is necessary to understand that from the laser tube to the focusing lens, the laser beam must go straight, bouncing in the center of the mirrors and passing through the center of the lens. This should be the same throughout the work area.
If the tube is uneven horizontally or vertically, the laser beam will be misaligned from the beginning and it will be very difficult to align it with the mirrors.
Between the mirror Nº 1 and the mirror Nº 2 the laser beam is aligned on the entire Y axis of the machine; that is from back to front and vice versa throughout the table.
Between the mirror Nº 2 and the mirror Nº 3 the laser beam is aligned on the entire X axis of the machine; that is from left to right and vice versa throughout the table.
Between the mirror No. 3 and the lens, the perpendicularity of the laser beam is aligned with respect to the lens and the material.
Symptoms that My Machine Needs Alignment
Although they can mean another type of damage. These 3 points are indicators that the alignment of mirrors of our laser machine need to be verified:
The laser cutting machine cuts in some parts of the work area and not in others.
The impact of the laser beam against the material leaves a shadow.
The machine does not cut with the power and speed it should.
Well now that we have more information on how the optical circuit works. And what are the parts we will start the calibration process.
We recommend using a power from medium to low, between 50% and 20% of the laser beam to do the tests. When the power is lowered to the laser beam the “diameter” of the beam is smaller. And its power too, so we will have a smaller and more accurate brand.
To verify where the laser beam impacts on the mirrors, depending on the type of mirror support your machine has. You should use paper tape. Or cut acrylic glass with paper tape attached to the mirror supports.
This is because in some media when putting tape. This is very close to the mirror and when the beam is fired the tape burns and dirties the mirror. In other cases there are supports that have a “perforated profile” that is separated from the mirrors. Thought just to put tape and not dirty the mirror.


